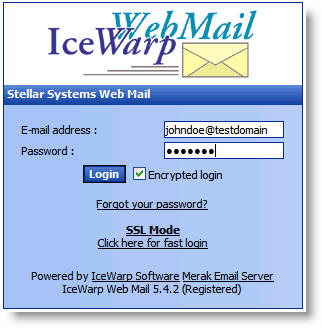
In your Internet browser, enter the address of your webmail server as http://webmail.<domain>, where <domain> is the name of your internet domain (ie - acme.com, microsoft.com, etc.). If you don't know what this is, type in http://webmail.ssinet.com. You will see a login screen as shown here:
Enter your email address and password, and click the LOGIN button. You will be taken to the main screen of your webmail account.
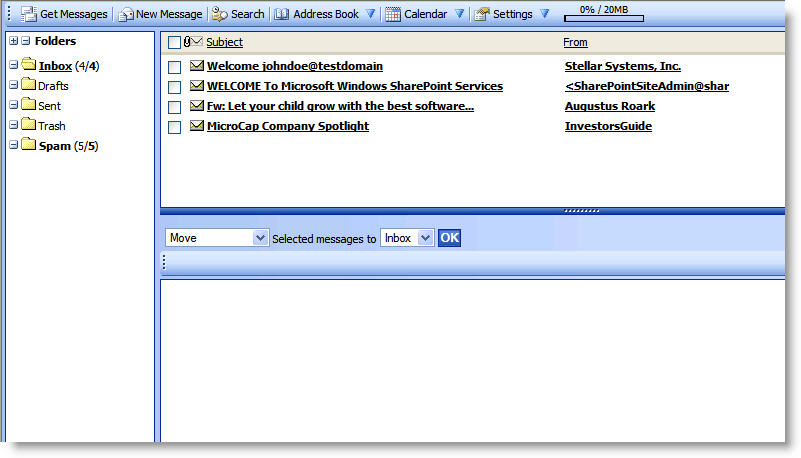
The layout is most like the popular email clients today such as Outlook, Outlook Express or Netscape. Columns show mail by subject, the sender of the email, when the message was received and the size of the message.
Above the columns is a graphical usage bar that tells how much space you have used in your mailbox. Unless you have made prior arrangements with Stellar Systems, which usually entails a change of price, your default email box size is 20 megabytes.
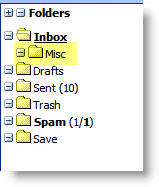
The FOLDERS SECTION shows you all of your webmail folders.
Here you can see all of your folders. Everyone has INBOX, DRAFTS, SENT
and TRASH. If you are also using Spam folders with the spam filtering
option, you will have a SPAM folder that most likely have spam mail in
it. Click here to learn about managing your spam
mail.
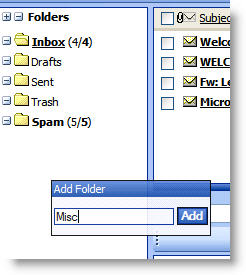
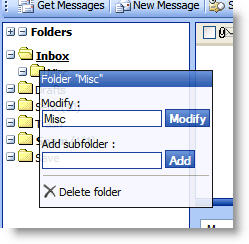
You have options to ADD, DELETE or MODIFY a folder. You can only modify folders that you create. The folders shown above are system folders and CANNOT be modified or deleted. To add a folder, right click on the folder in which you want to add the new folder. A new box pops up and you are prompted for a folder name. Enter the folder name and click ADD.
You will then have a new folder as seen here:
To add a subfolder, delete or modify (rename) the folder, right-click on it and choose the desired option from the windows that pops up:
The numbers to the right of each folder show you the number of unread/total messages contained in that folder. Click a link to the folder of your choice, and you will have the ability to read, move or delete any messages in that folder. Messages can be moved or copied by checking the box next to the message, and choosing MOVE or COPY from the lower left hand combo box. Messages call be changed to READ or UNREAD by selecting the appropriate option in the menu. Selecting a message's checkbox and clicking the DELETE SELECTED button will delete the message.
Email that is in the INBOX of your webmail account will also be downloaded to the inbox of your PC's email client software. Conversely, if you move any messages out of the webmail inbox, they will not download into your email client software. This also means that any mail that is in your spam folder will not be available to your email client inbox until you move it from the SPAM folder to the INBOX.
Across the top of the page is a menu toolbar buttons that change your folders, screens and user options.
![]()
The default "home" button is labeled GET MESSAGES. This takes
you to your inbox.
![]()
The NEW MESSAGE button takes you to a page to create a new email
message.
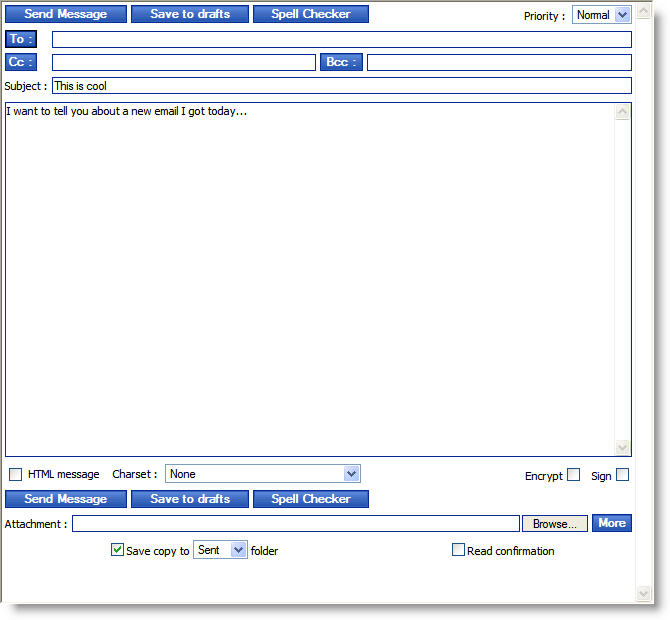
Options are typical of most email programs. The TO: box lets you type
in an address for a user. If you click the TO: button, you will see a
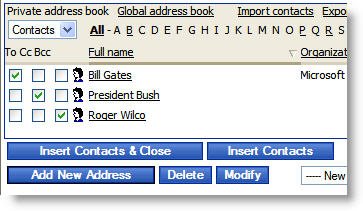
pop-up screen appear that contains your private address book.
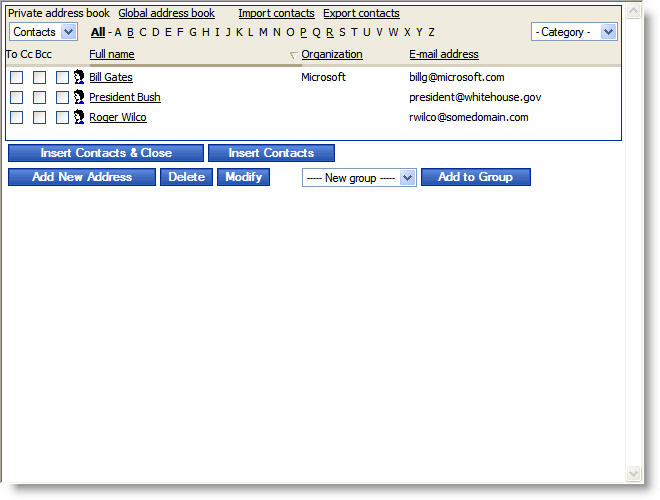
In this window, you can select addresses for use in this email message, ADD,
DELETE or MODIFY a contact, and switch to the GLOBAL ADDRESS BOOK.
The private address book is maintainable by you the end user, and the global
address book is maintained by Stellar Systems.
At this point, click either the TO, CC, or BCC checkbox(es) to place those addresses in the current email message. If you click the INSERT CONTACTS & CLOSE button, the contacts are added to the email message and you will be taken back to the email message. If you click INSERT CONTACTS, the addresses will be inserted into the email message in the other window, but you will remain in the address book so you can add, search for and/or enter more names from the address book(s).
You can see the addresses entered into their respective fields.
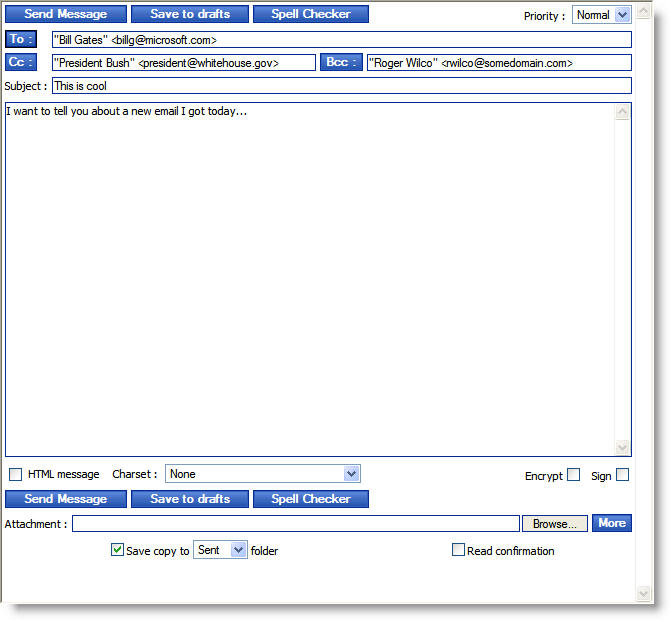
The HTML MESSAGE option at the bottom turns on HTML formatting so you
can insert HTML tags and formatting for your message. SAVE TO DRAFTS
will create a copy of the message to your drafts folder for you to work on later.
Click SPELL CHECKER to run a spell check on your message. SAVE COPY
TO SENT FOLDER will save a copy to your sent folder. READ CONFIRMATION
will send the message and request a receipt from the receiver when they read
the email. ENCRYPT and SIGN options are functional
if you have a personal identification certificate installed for your email account.
Most people don't have certificates, but if you are interested or need a certificate,
or you need assistance with this, please contact us. These options remain on
when turned on, or off when turned off. Click SEND MESSAGE to send the
email.
![]()
The SEARCH button allows you to search for emails in your folders.
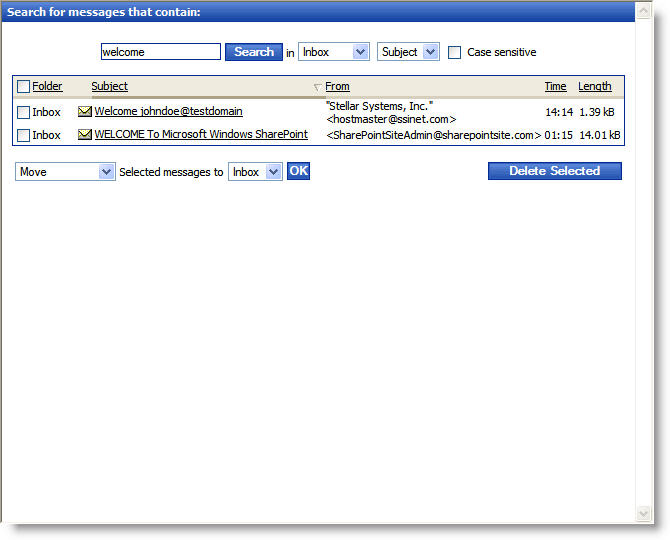
You can search for messages in any folder with text in any field.
![]()
The ADDRESS BOOK button will take you to the address book as explained
above.
![]()
The CALENDAR button will take you to a web-based calendar.
There is a lot of functionality in here that is way beyond the scope of this
tutorial, so we will not cover it in this tutorial. If you need assistance with
it, please contact us and we will assist you.
![]()
The SETTINGS button takes you to the configuration options for your email
account.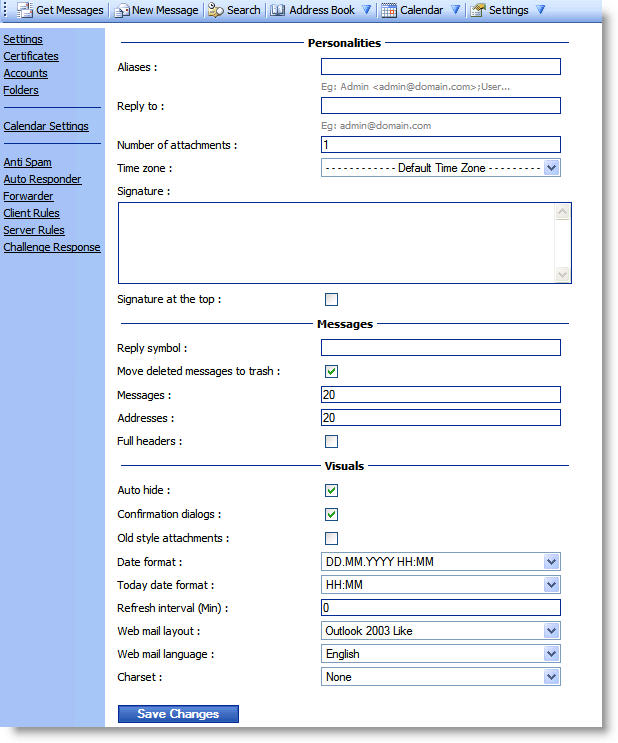
In this screen, you can edit various settings to change how your email account
works.
ALIASES allows you to create a different alias that you can choose when you send email. It will make the email look as if it is coming from a different address. This alias can be used in the new email window. It will add an additional field at the beginning of the email to let you select which alias you want to send the email from. The REPLY TO option will let you change the email address that a recipient will reply to when the click the reply button in their email client.
NUMBER OF ATTACHMENTS lets you change the default number of file attachment fields in your emails that you send. The default is 1.
TIME ZONE lets you change your time zone. This is used in the calendar.
SIGNATURE lets you create a signature that is added to the bottom of each new email you create. You can choose to add SIGNATURE AT THE TOP, but this is not common.
The REPLY SYMBOL adds the character of your choice before every line of original text in a reply email to help set aside your text from the text that you are including in the reply from the original email. The usual character used here is ">".
The checkbox to MOVE DELETED MESSAGES TO TRASH will move the deleted items from your inbox and folders to the TRASH folder, and not permanently delete them. In order to permanently delete them you will have to click the EMPTY TRASH button from inside of the TRASH folder.
AUTO HIDE enables the collapsing system in the Calendar - Add Event, etc. Internet Explorer 5 or higher is needed to have correct functionality of this feature.
CONFIRMATION DIALOGS enables/disables the dialog in some risky situations so user can not lost some data/messages by mistake. e.g. it requires confirmation when user wants to delete any message.
OLD STYLE ATTACHMENTS changes the setting for whether the attachment is shown as a paperclip-type icon in the message header or as a link to a file at the bottom of the message.
DATE FORMAT determines in which format the Date in the Message List is shown. It is not applied to messages which were received the same day when user browses them. See next option.
TODAY DATE FORMAT can set specific date format for messages which were received the same day when user browses them.
REFRESH INTERVAL is the time specified in minutes after which the Message List is automatically refreshed. "0" means no refresh.
WEB MAIL LAYOUT allows you to change the "skin" of the webmail interface. For best functionality, it is optimal to leave this set to "Outlook 2003 Like".
The WEBMAIL LANGUAGE and CHARSET define the language and character set of your email session. DO NOT CHANGE THESE AS IT MAY BE VERY DIFFICULT TO CHANGE THEM BACK.
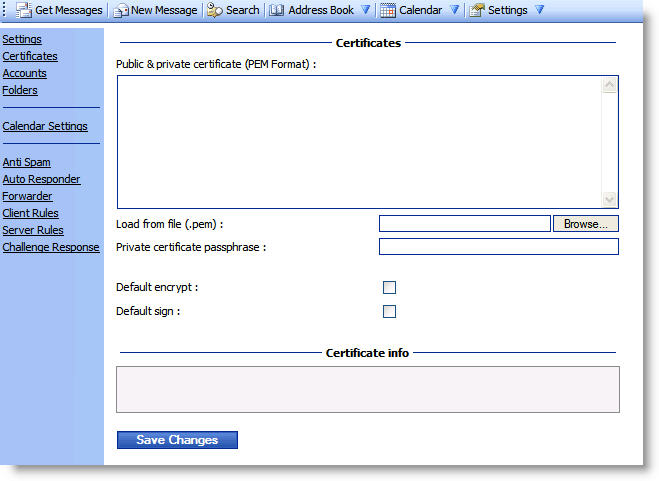
The CERTIFICATES link on the left menu allows you to install a personal ID certificate to encrypt or sign your email. Please call if you need assistance or have questions.
The ACCOUNTS link allows you to modify your existing account password, add an alternate email address (for use to recover lost passwords), and add external addresses to your webmail account so you can check them all from one place. You can add email accounts from other your home ISP or another hosting service.

Click MODIFY to change the settings of your current account.
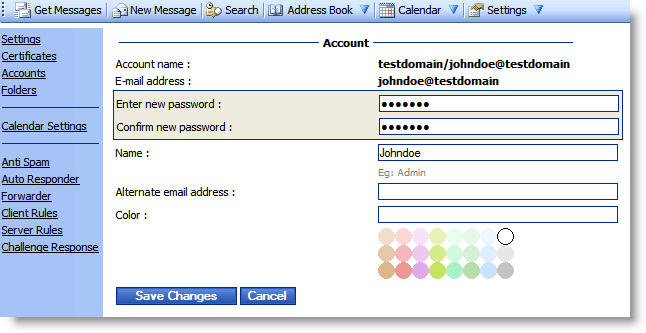
Here you can change your email password, name, and even add the alternate address.
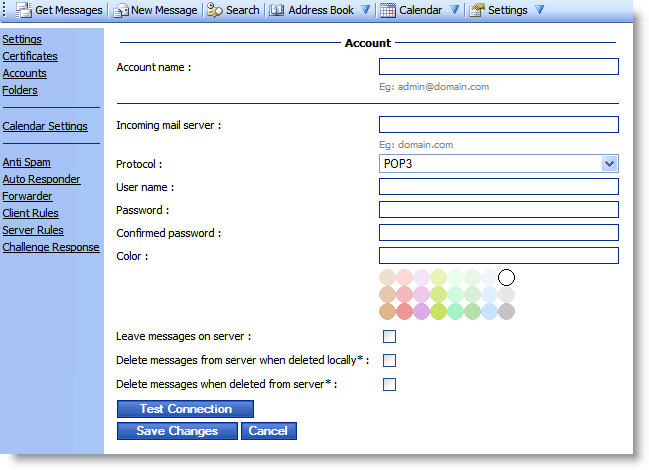
This is the screen you will see to add a new external email account.
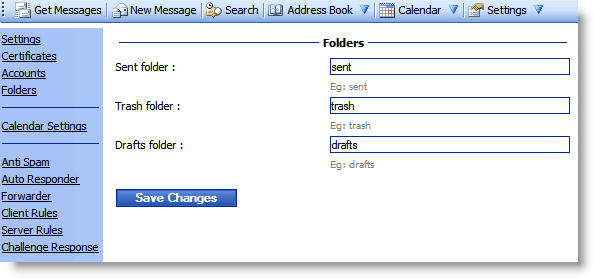
The FOLDERS link allows you to change the name of your system folders - SENT, TRASH & DRAFTS.
The CALENDAR SETTINGS link will let you change the settings for your calendar. As stated before, the functionality of this feature is outside the scope of this tutorial, and will not be discussed here. If you need assistance with it, please contact us and we will assist you.
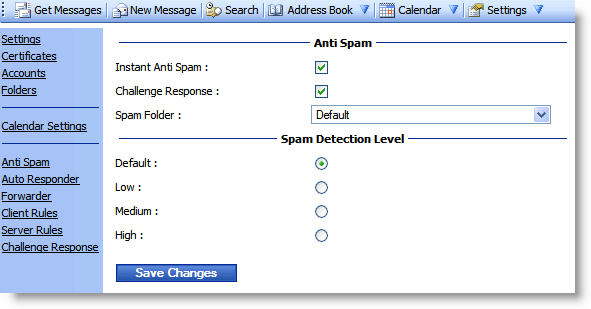
The ANTISPAM link will let you change the settings for the spam filtering. BE CAREFUL IN HERE. If you are getting too much spam or are not getting legitimate email that is getting caught, you can adjust these settings, but you risk creating problems if you do. When in doubt, please call us for assistance. For more information about administering the Spam Filtering System, click here.
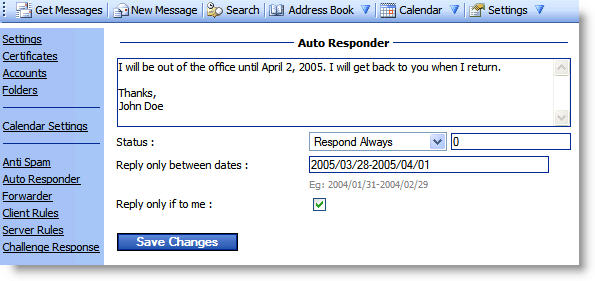
The AUTO RESPONDER link allows you to set an away message to reply to people that send you email while you are away for an extended period. You can set to No Responder, Respond Always, Respond Once, or Respond After a Period. The preferred method is to enter your message, set status to Respond Once, and type the dates you want the autoresponder to work (YYYY/MM/DD-YYYY/MM/DD) and it will respond once to each individual email and then stop sending when the time period is over. It's also best to check the REPLY ONLY IF TO ME option as this will keep the responder from replying to most newsletters (and hopefully spam). We don't recommend the Respond Always option (especially without a time period) as this can create a scenario where two mail servers end up autoresponding to each other, creating a loop and excess mail (and filling up your inbox) and traffic. It has happened before!
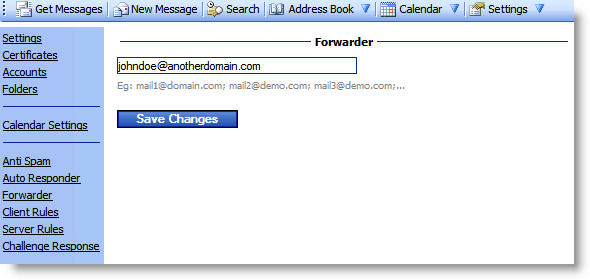
The FORWARDER link will give you a way to forward all email to any email address you want.
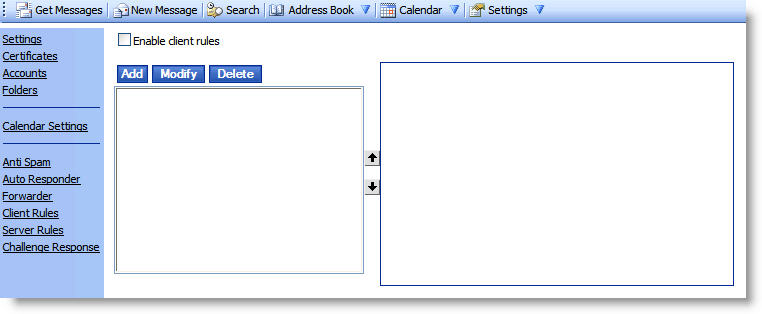
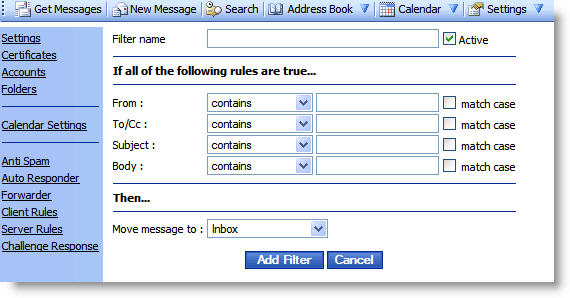
The CLIENT RULES link lets you create filters and rules to move your mail into different folders based upon the conditions you set. These filters will only run when you login to the webmail interface. They do not run all of the time. In order to do server-side filters, read the next section.
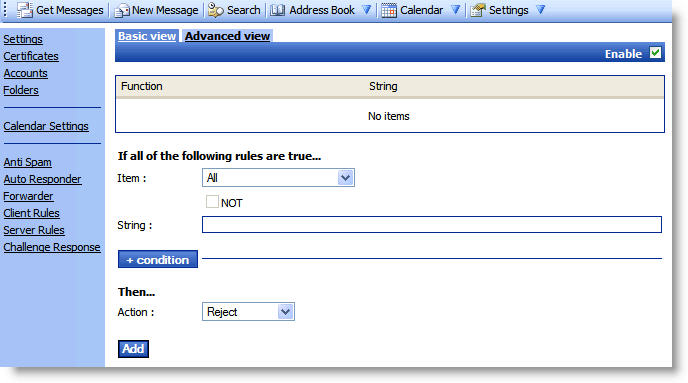
The SERVER RULES link takes you to the heart and soul of the customized filtering area that is just for you. These rules and filters run at the server always. Any email coming into the server for you that meets these conditions will have them applied as soon as they come in. You can set conditions to manually reject, accept, delete, mark as spam, forward or notify. The most you will probably see here are conditions that you have set from the Anti-Spam system which is detailed here.
At any time you need assistance, click on the blue ? button on the top right line tool bar menu. The red X button will log you out of the webmail session.
![]()
If you have any problems or technical questions with any spam or email-related issues, please contact us directly via phone or email.
Stellar Systems, Inc.
(309) 677-7350
hostmaster@ssinet.com